
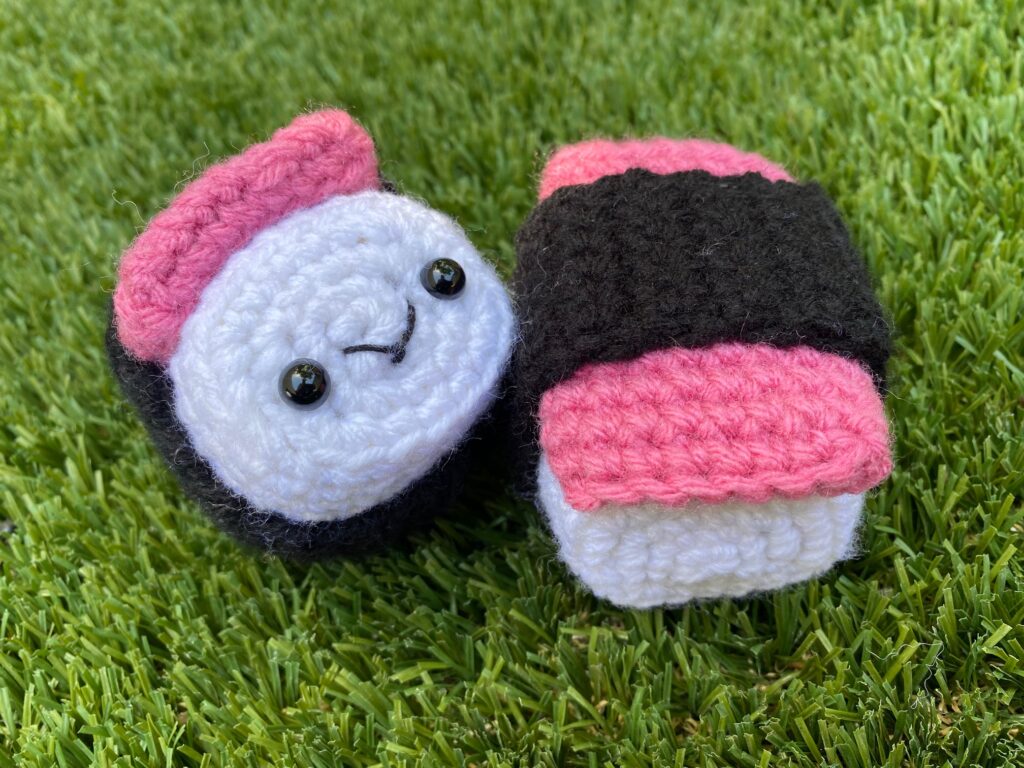
Spam Musubi Amigurumi Pattern
An adorable, quick, easy pattern for beginners! The only stitch you need to know is the single crochet! If you want to learn how to do that, I have a tutorial available! I would love to see any of my patterns that you make! If you post on social media, I am @crochetwithkathryn on Instagram and TikTok.
Let me know if there is anything I can do to improve the pattern so I can provide changes or further clarification. If needed, I have a tutorial on YouTube for this pattern so you can easily follow along to that as well
Pattern Notes:
Pattern is written in USA terms
Use the locking stitch marker in the first stitch in the first stitch of each round so you can keep track of your stitch count
No need to use the exact yarn I used, the brand and color is for informational purposes. This pattern is also not sponsored by these yarn brands
Materials Used:
Yarn:
Red Heart Super Saver in Soft White
Red Heart Super Saver in Light Raspberry
Big Twist by Joann in Black
Hook: 4mm crochet hook or G
Sewing Pins
Fiber fill
Locking stitch markers
Tapestry Needle
Pencil (optional)
Cardboard (optional)
Safety eyes (optional)
Black embroidery floss (optional)
Abbreviations:
MR – magic ring
St – stitch
Sc – single crochet
inc – increase (two single crochets in the same stitch)
inv dec – invisible decrease (joining two single crochets into one through the front loop of the stitch only)
BLO – back loop only
Now that we have covered everything, let’s get started!
Rice:
Rnd 1: MR with 4 sc (4)
Rnd 2: Inc in each st (8)
Rnd 3: 3 sc in the 1st st, 2 sc, 3 sc in the same st, repeat (16)
Rnd 4: 1 sc, 3 sc in the same st, 4 sc, 3 sc in the same st, 2 sc, 3 sc in the same st, 4 sc, 3 sc in the same stitch, 1 sc (24)
Rnd 5: sc around in BLO (24)
Rnd 6-8: sc around (24)
optional – use the pencil to trace the rectangle shape twice onto the cardboard and cut out both pieces
optional – attach safety eyes and sew on mouth begin to stuff a slightly, enough to cover back of safety eyes. Insert one of the cardboard pieces
Rnd 9-16: sc around (24)
optional – insert second cardboard piece in to the rice piece
Rnd 17: in BLO, 1 sc, inv dec in the next 3 st, 4 sc, inv dec in the next 3 st, 2 sc, inv dec in the next 3 st, 4 sc, inv dec in the next 3 st, 1 sc (16)
Rnd 18: inv dec in the next 3 st, 2 sc, inv dec in the next 3 st, repeat (8)
Rnd 19: inv dec in each st (4)
*Fasten off and weave in end
Spam:
Chain 9
Row 1: 7 sc in the little ‘bump’ under the “V” shape of the st, in the last st place 2 sc
On the backside of the row where the “V” shaped sts are, sc in the next 7 sts in BLO, in the last sc, place 2 sc in the last st
Now again, over row 1, sc across in BLO
*We have now created a round around Row 1, this will count as Round 1
Rnd 2-11: sc around (18)
Rnd 12: 4 sc, then in BLO sc in the next 7 sts
*Fasten off and leave long tail for sewing
*Sew the spam closed with the tail left for sewing and weave in end
Nori:
Chain 7
Row 1-33: sc 6 across, chain 1 and turn
Row 33: sc 6 across and fasten off
*leave a tail for sewing
There should be a total of 34 rows
Assembly Instructions:
1. Using the sewing pins, pin the spam in place over the rice
2. Cut a long string from the yarn used for the spam to sew the spam to the rice
3. On the sides only, sew the spam to the rice, we want the sewing stitches to be hidden by the nori when we put it on, weave in the ends
4. Use the long tail from the nori to sew it in a loop (sew the first row to the last row of nori piece), DO NOT weave in end or cut the string once finished sewing
5. Place the nori over the rice and spam pieces
6. With the remaining string from the nori, sew the nori only onto the underside of the rice, making sure to only sew where you will not be able to see if the plushie is sitting on a flat surface.
All finished!
*Below is a more detailed version of the pattern with no abbreviations
Rice:
Round 1: Magic ring with 4 single crochets (4)
Round 2: Increase in each st (8)
Round 3: 3 single crochets in the 1st stitch, 2 single crochets, 3 single crochets in the same stitch, repeat (16)
Round 4: 1 single crochet, 3 single crochets in the same stitch, 4 single crochets, 3 single crochets in the same stitch, 2 single crochets, 3 single crochets in the same stitch, 4 single crochets, 3 single crochets in the same stitch, 1 single crochet (24)
Round 5: single crochet around in BLO (24)
Round 6-8: single crochet around (24)
optional – use the pencil to trace the rectangle shape twice onto the cardboard and cut out both pieces
optional – attach safety eyes and sew on mouth begin to stuff a slightly, enough to cover back of safety eyes. Insert one of the cardboard pieces
Round 9-16: single crochet around (24)
Round 17: in the back loop only, 1 single crochet, invisible decrease in the next 3 stitches, 4 single crochets, invisible decrease in the next 3 stitches, 2 single crochets, invisible decrease in the next 3 stitches, 4 single crochets, invisible decrease in the next 3 stitches, 1 single crochet (16)
Round 18: invisible decrease in the next 3 stitches, 2 single crochets, invisible decrease in the next 3 stitches, repeat (8)
Round 19: invisible decrease in each stitch (4)
*Fasten off and weave in end
Spam:
Chain 9
Row 1: 7 single crochets in the little ‘bump’ under the “V” shape of the stitch, in the last stitch place 2 single crochets
On the backside of row 1 where the “V” shaped stitches are, single crochet in the next 7 stitches in back loop only, in the last single crochet, place 2 single crochets in the last stitch
Now again, over row 1, single crochet across in the back loop only
*We have now created a round around Row 1, this will count as Round 1
Round 2-11: single crochet around (18)
Round 12: 4 single crochets, then in back loop only single crochets in the next 8 stitches
*Fasten off and leave long tail for sewing
*Sew the spam closed with the tail left for sewing and weave in end
Nori:
Chain 7
Row 1-33: single crochet 6 across, chain 1 and turn
Row 33: single crochet 6 across and fasten off
*leave a tail for sewing
There should be a total of 34 rows
Assembly Instructions:
1. Using the sewing pins, pin the spam in place over the rice
2. Cut a long string from the yarn used for the spam to sew the spam to the rice
3. On the sides only, sew the spam to the rice, we want the sewing stitches to be hidden by the nori when we put it on, weave in the ends
4. Use the long tail from the nori to sew it in a loop (sew the first row to the last row of nori piece), DO NOT weave in end or cut the string once finished sewing
5. Place the nori over the rice and spam pieces
6. With the remaining string from the nori, sew the nori only onto the underside of the rice, making sure to only sew where you will not be able to see if the plushie is sitting on a flat surface.
All finished!
You are free to sell any completed plushies made from this pattern so long as I am credited for the pattern in the description of the item, and on social media posts. The completed items may be sold, but not mass produced.
You may not sell my patterns or claim them as your own.
Happy Crocheting!